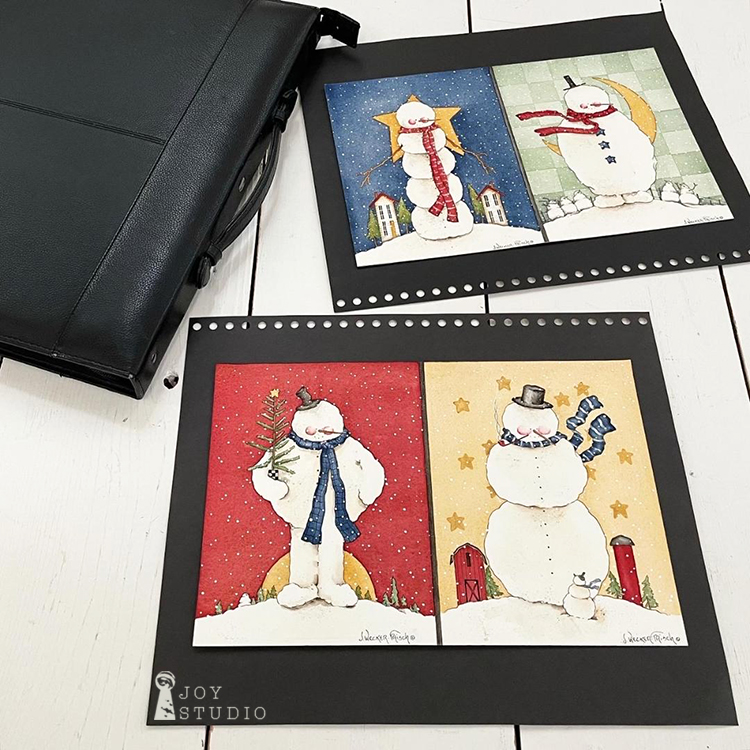
We are pleased to announce our 3rdGreat Joy Studio workshop. This will be our first in the NEW space!
On July 19th we are hosting a Christmas In July event, from 9:00 am. to 4:00 pm.
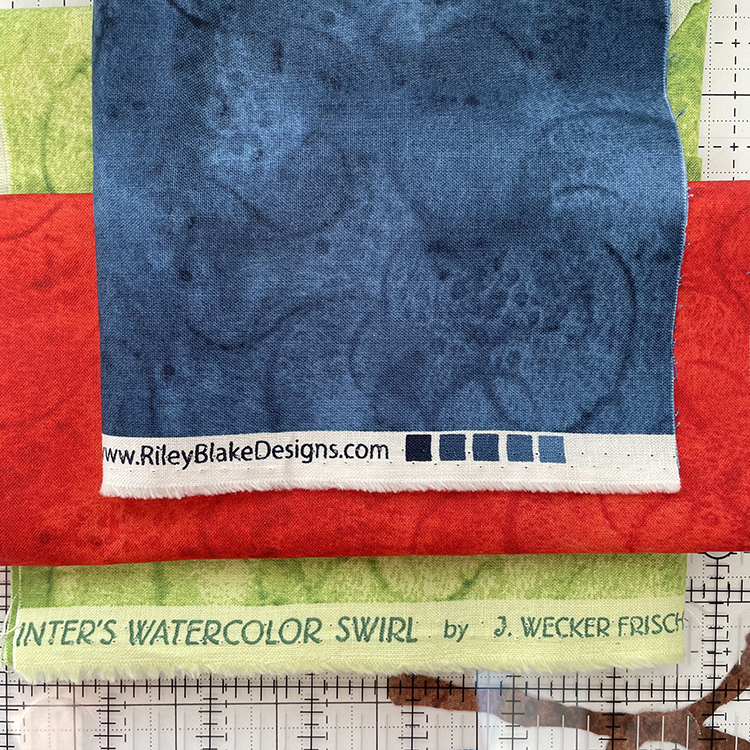
The projects feature the “White As Snow” fabric from Riley Blake Designs. The table runner and mug rugs projects can be found in the Wintry Project Booklet in quilt shops now if you want to follow along.
•
•
You can sign up with the Workshops tab to participate in person.
Kits for your projects, gift bags and a light snack are provided.
•
•
Your choice of several lunch options are within walking distance.
Agenda and a list of things to bring will be sent to participants previous to the event.
Workshop will be held in Eureka Missouri 63025 at 16 Dreyer Are.
Recommended accommodations Wildwood Hotel in Wildwood, MO
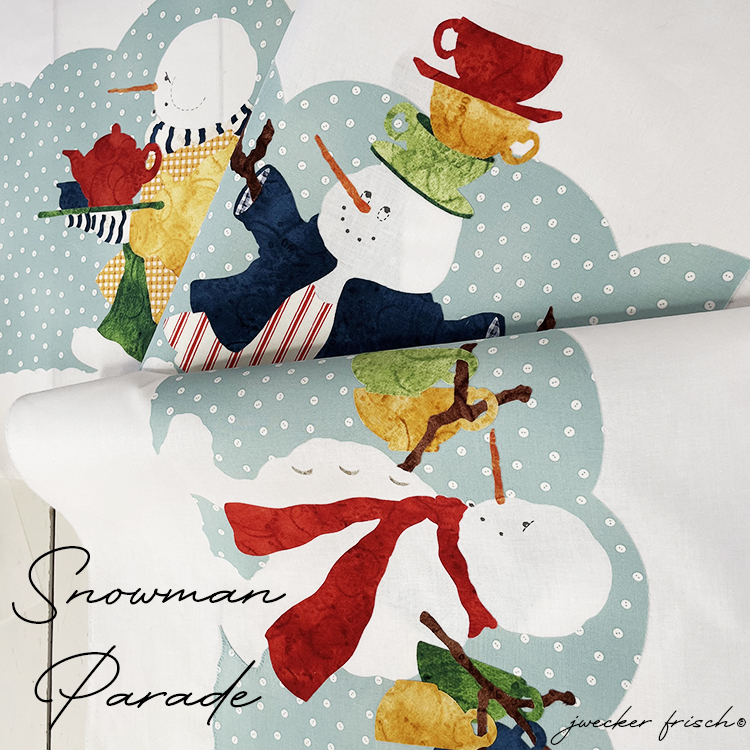
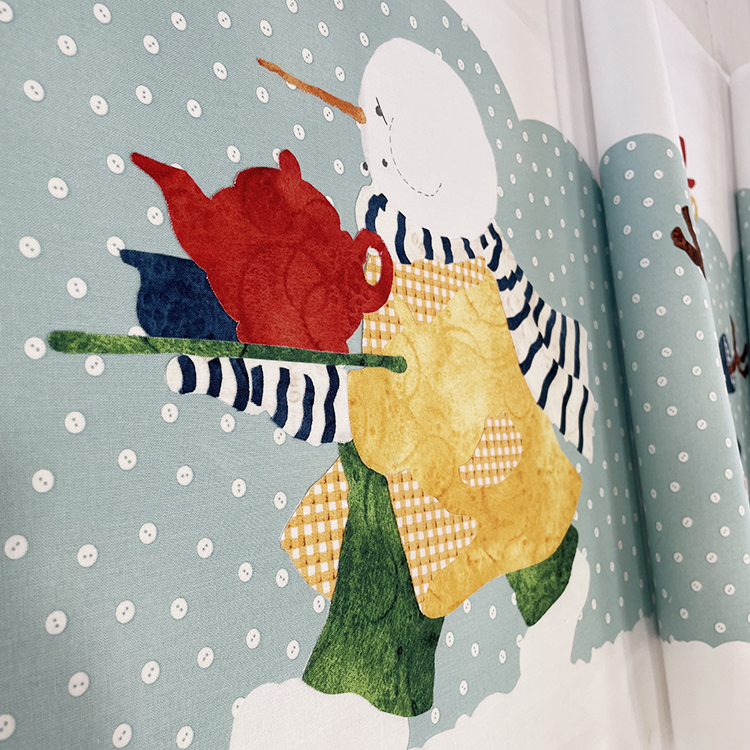
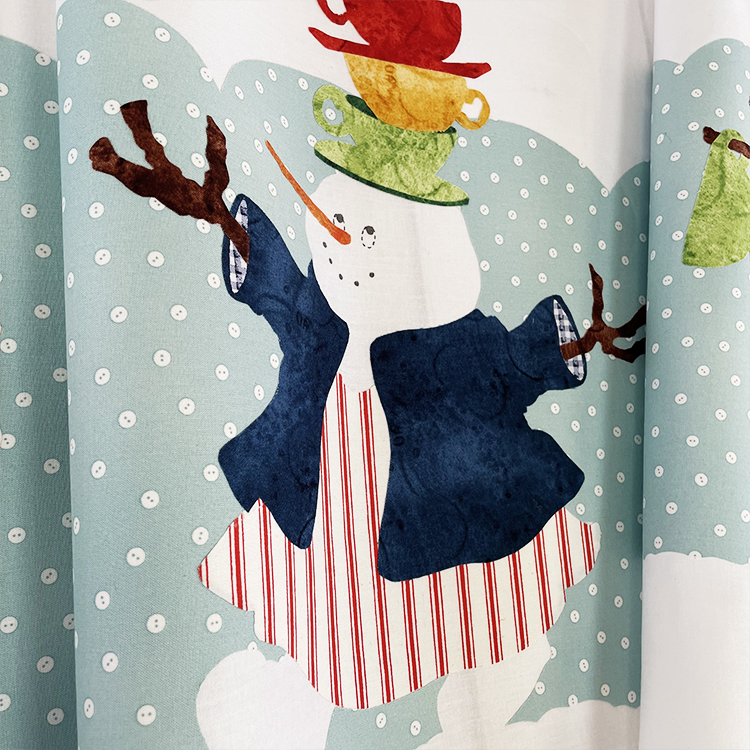
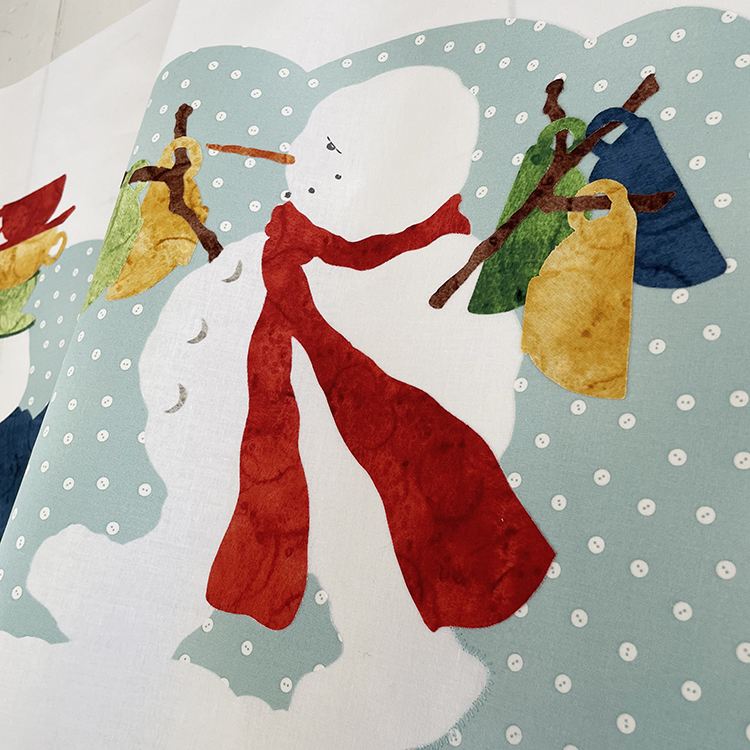
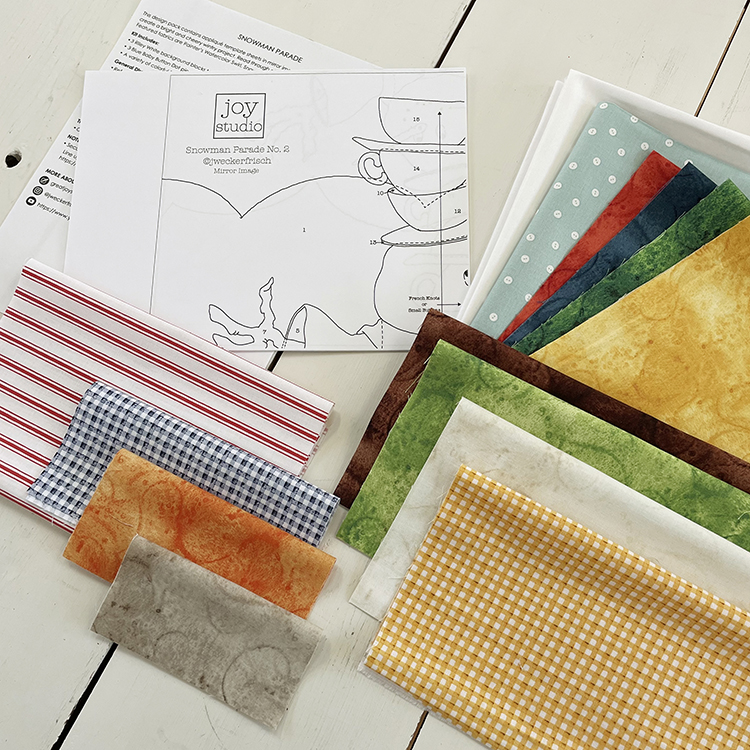
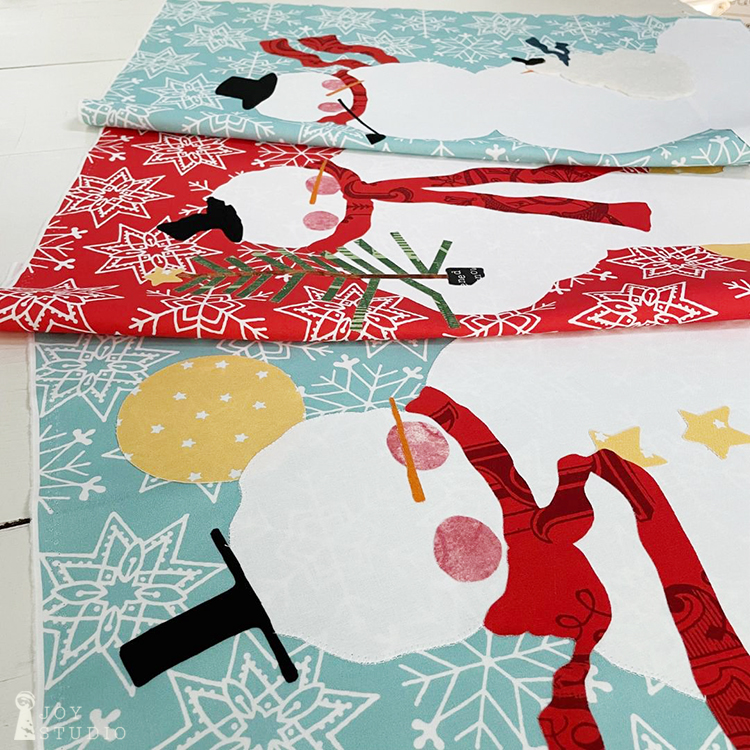
We have a new kit listing called Snowman Parade and are sharing a little bit of the process that we followed to make.
•
•
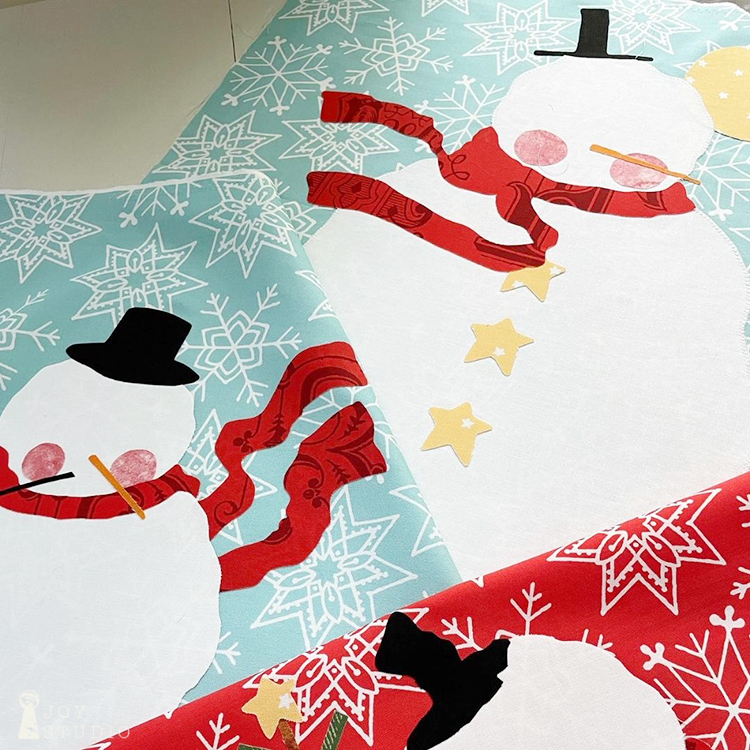
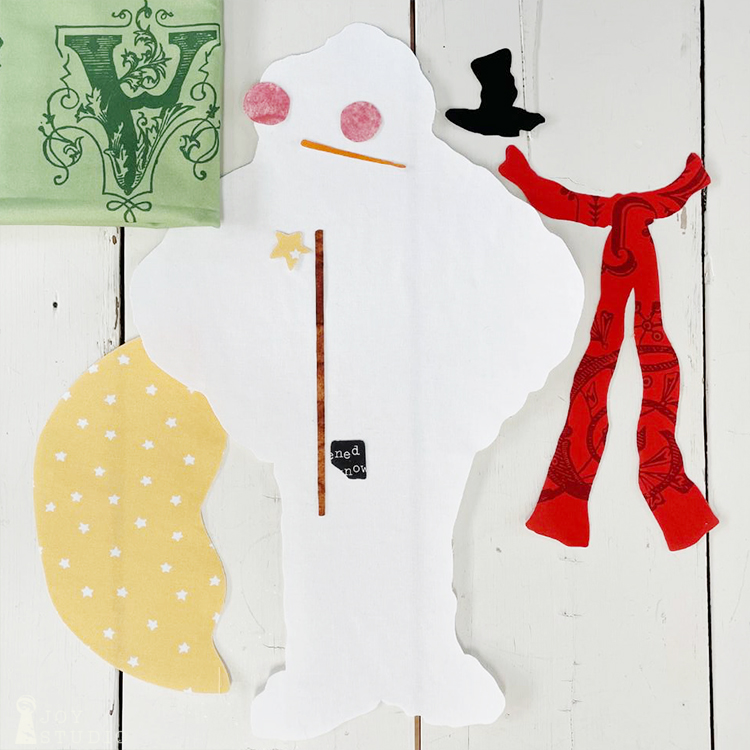
There are three of the snowmen characters from Janet’s Snow Sweet art/fabric collection translated to 16″ – 18″ raw edge appliqué blocks. These can be used for pillows, a table runner or any quilt projects and are simply fun to display throughout the winter months. In addition to the steps/photos posted here, you can view some tips we used, on our YouTube channel.
Our Snowman Parade kit can be purchased here in the shop and will contain Painters Watercolor Swirl, Snow Sweet, Blue Button Dots and basics from Riley Blake Designs. The kit also includes 12, 8.5″ x 11″ sheets to assemble for your templates and a basic appliqué instructions guide.
•
•
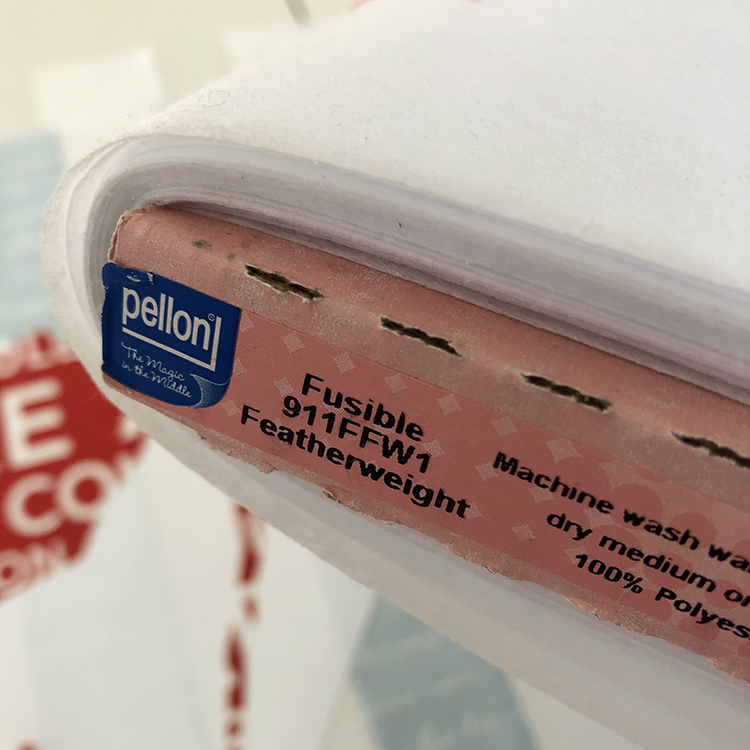
In addition to the kit you will need a fusible web product along with the typical sewing supplies. We like to use Pellon Fusible Featherweight 991FFW1 as our fusible web product from a 20″ wide bolt. We also recommend purchasing a large tablet of tracing paper to make a ‘placement door’.
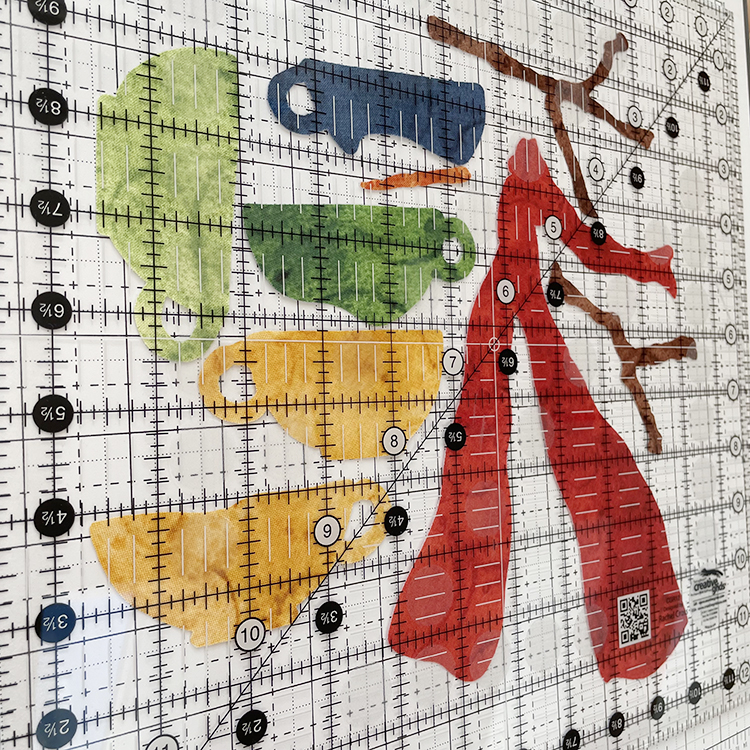
1.) Trace the appliqué templates on the paper side of your chosen product. Our templates are already in mirror and ready to go. A light box is a great help with this step however, taped to a window works perfectly fine. Rough cut them out and fuse each to the wrong side of fabrics. You will have this blog post, YouTube video and our IG posts as a fabric color guide. Sorry, no full color photo comes with the kit. Next, cut all of your appliqué pieces out with a sharp pair of scissors. You may like to place them under something to keep the pieces from curling up.
•
•
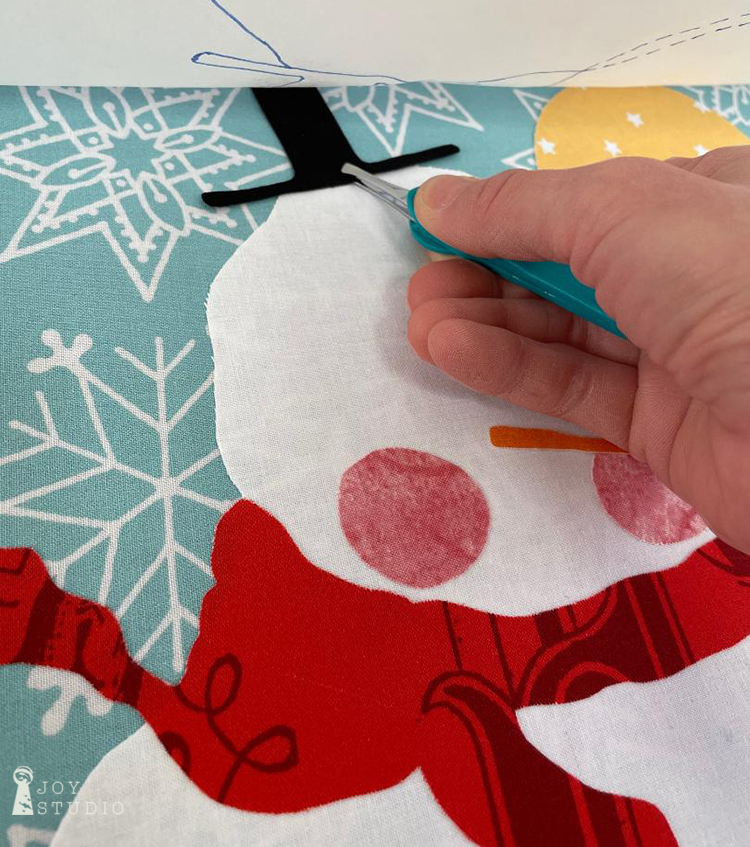
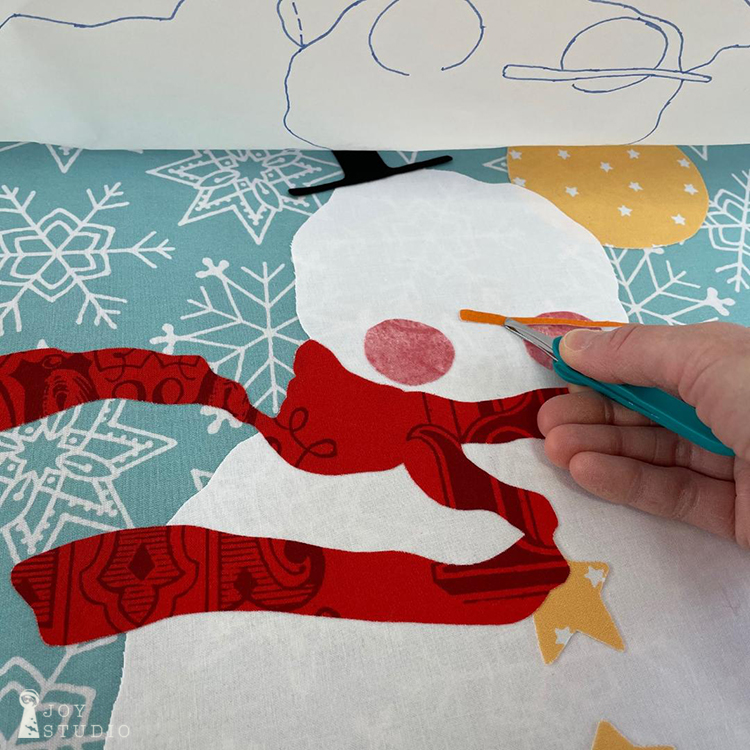
2) Assembling each block can be done with accuracy and best results using what we call, a tracing paper door. Appliqué pieces are sitting on top of one of ours in the photos below. However, you simply sandwich your pieces onto your pressing surface, background fabric, blue dots snowman silhouette with the tracing paper outline (traced using templates ahead of time) on top to achieve near perfect placement. This is best demonstrated here and here.
•
•
Next we will get these sewn down using decorative stitches on the machine and assemble into our project. We’re thinking a table runner!
Follow us on Instagram or Facebook for updates.
Thanks for visiting, as always and Merry Christmas!!!
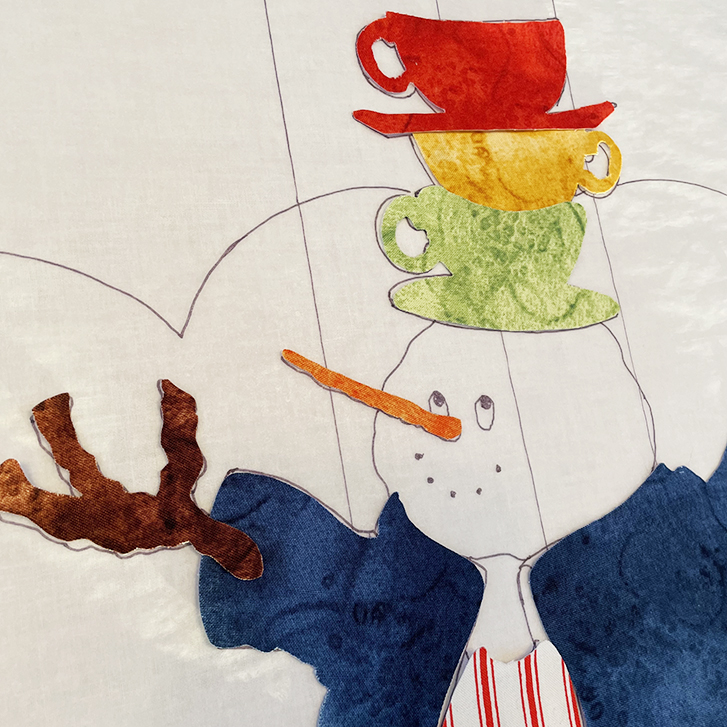
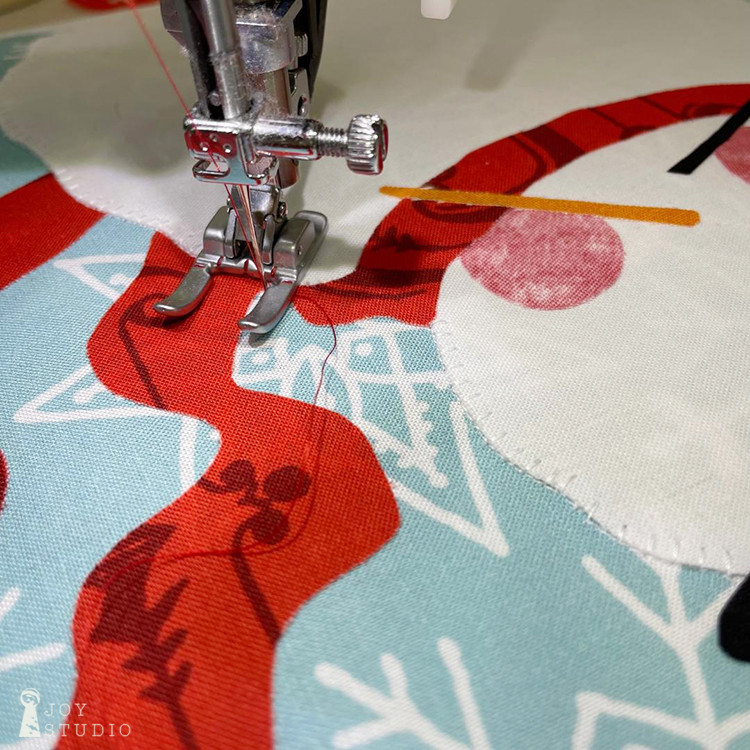
By this time you have your three snowmen blocks completely fused and are ready to sew. If not, as always continue at your own pace. The only thing we have left to complete these blocks now is to secure the appliqué designs to the background fabrics and add any decorative stitching. There are many stitches and styles you can use to do this and the choice is entirely yours, you’re the maker!
•
•
I am most comfortable using one of my (basic Pfaff) machine’s options that is most like a blanket stitch to outline and secure my appliqué pieces to my background fabrics. I started with the large white pieces first. These are a bit stiff since we used an extra layer of interfacing and your appliqué pieces can pull up with handling so be careful to get them well fused. If this happens however, before you are ready to sew simply press over them again to reactivate the fusible glue. If you use this type of stitch you want to lay your needle right beside your appliqué fabric edge close as you can for the running stitches.
•
•
I also chose the same color thread that best matched my fabrics or close as I had on hand. I used 50 weight cotton Aurifil. Both of these choices (blanket stitch and same color thread) seam to make up for any imperfections due to my beginner sewing skills. Of course you can go with any style such as free motion or any number of decorative stitching that you like.
•
•
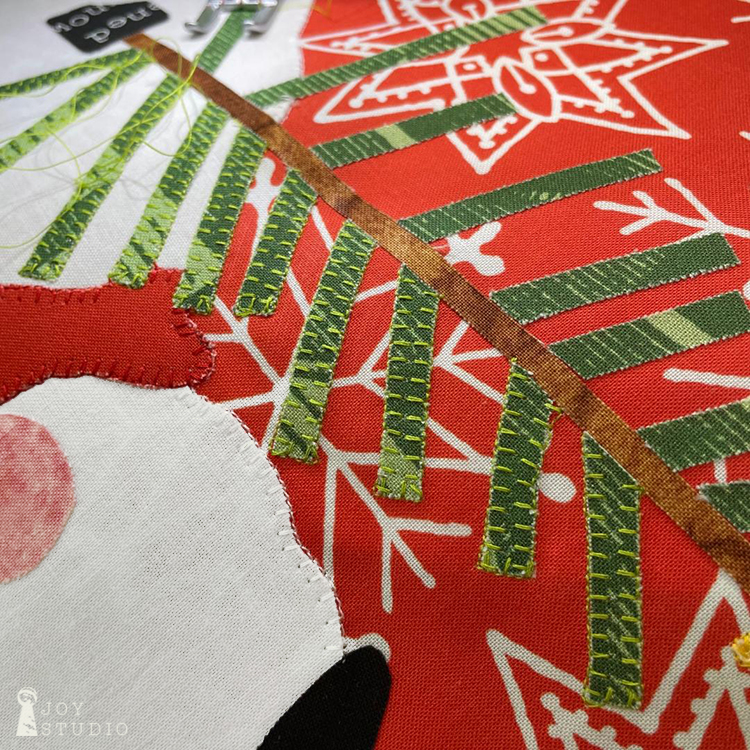
I continued by sewing the next largest pieces first red, then yellow, green and so on until I finished stitching around all of the smaller pieces.
For my green, I only had a lime shade but I think this helped to distinguish the tree branches against the two darker fabrics.
•
•
Remember! These blocks still have to be quilted so, hold off on any 3-D embellishments like buttons or charms, etc. Which explains the blank look on our snowmen faces. Lol! I actually have tiny black buttons for his eyes and mouth and can’t wait to see them finished. 😉
•
•
We will post our finished blocks on Instagram and Facebook so, if you want to see our updates and the rest of our blocks in this quilt, plus anything new, you can follow us here:
You should already have your three background snowflake fabrics cut and set aside to receive the snowman appliqué items per instructions.
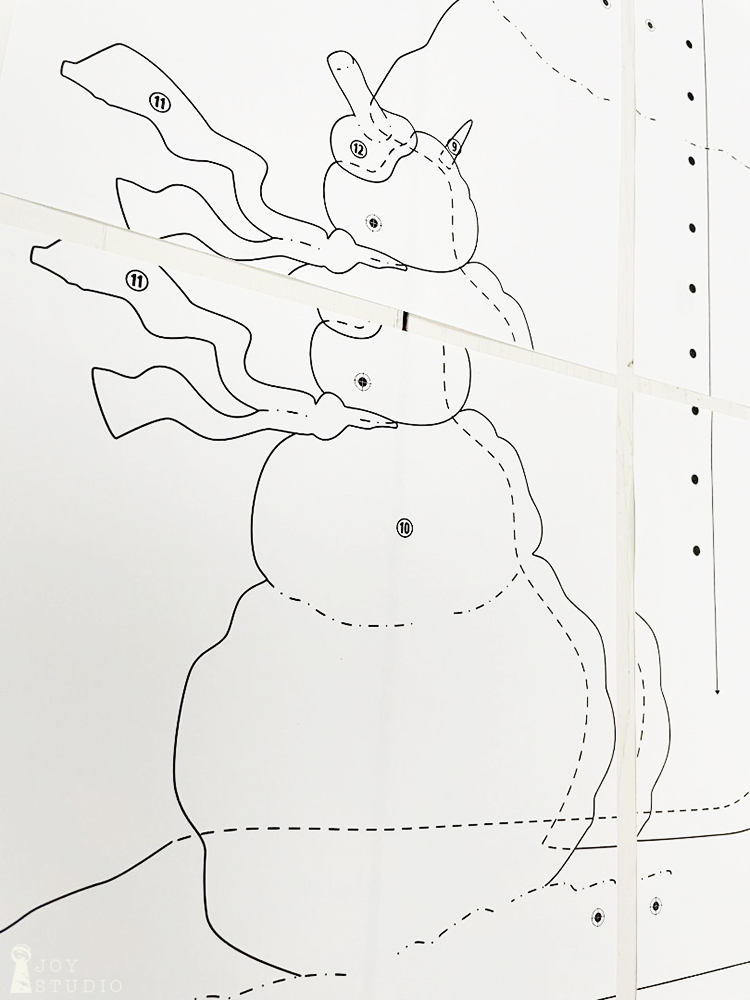
So, first thing is to tape your snowmen template sheets together. There are six sheets per snowman included in your pattern. You will want to take a little time with this to match up registration marks and get them squared up to the correct block size.
•
•
Now you’re ready to begin tracing the individual shapes of each item in the snowman image onto your fusible web products. We like using a fine tip Sharpie in any color however, using a different color for each block will make organizing your fusible pieces much easier to access readily. The All About Christmas quilt pattern templates are already in reverse so trace with template sheets, printed side up, on the paper side of you fusible products. Again, just as in the fabric cutting suggestions last week, place and trace your largest glue pieces first to assure you will have enough of the fusible to complete this process.
Next begin laying out all of your smaller appliqué pieces in the remaining areas where they fit best for utilizing all of the fusible materials. We stronglysuggest numbering the pieces too as you go. This will come in handy later when you begin to arrange and fuse the difficult to recognize pieces on your background fabric blocks. Once all of your fusible web pieces have been drawn, rough cut them out and organize by block.
•
•
Side Note: You will be tracing your Riley White snowman and snowy ground twice, first on your chosen fusible web product and a second time on a lightweight fusible interfacing product. We use Pellon Fusible 911FFW1 Featherweight. This will help to block the fabric underneath from showing through your white appliqué fabrics. You may want to use this method for the yellow fabrics in your piece also. Layering sequence when you are ready to fuse these, will be wrong side of appliqué fabric to interfacing, that unit to fusible web and then onto background fabric in the indicated order. You will end up with a heavier/thicker appliqué unit.
•
•
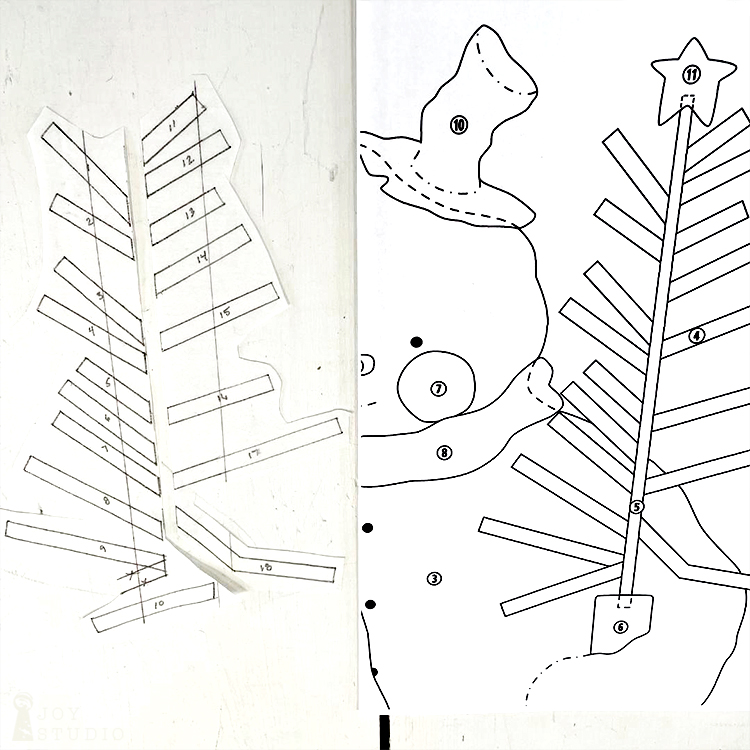
Next, making your raw-edge appliqué pieces.
Refer to the pattern cover art to begin fusing the correct, numbered fusible web pieces to their corresponding fabrics, according to the manufacturers directions. After all of the appliqué pieces are fused, you can cut them out accurately with a good sharp pair of scissors. I do not use my ‘for fabric only’ scissors for this but rather a specified favorite. We recommend letting all of your appliqué pieces coolcompletely before attempting to remove the paper backing. If time allows we prefer waiting overnight but a couple of hours may be enough. Another tip for removing the paper is to score a line with anything sharp but not enough to cut through the fabric, anywhere on the paper side of your fused appliqué. Then begin peeling the backing paper away from the fabric using the scored line as a stating point. This will help to prevent fraying your fabric edges.
•
•
Now, building the snowman blocks!
After all of the paper is removed from your appliqué pieces, you are ready to arrange and place them in your snowman blocks. The numbers on each snowman template indicate which piece is the next to be fused. As stated in last week’s post, placement is best achieved using a placement sheet. Since you cannot view the template sheet through the background fabrics we like tracing the template onto a sheet of ordinary tracing paper to make a placement sheet ‘door’. Explained last week here and shown below.
You can see in the above phoyo that we opted to cut out the small snowman (block 3) both in cotton and batting to offer a little extra pouf . This is your preference.
•
•
Having fun yet?
I like the cutting and fusing best myself, but next week we are
READY to SEW!
•
•
Show us your progress as you follow and tag me on Instagram @jweckerfrisch
and please use #allaboutchristmasfabric to share your photos.
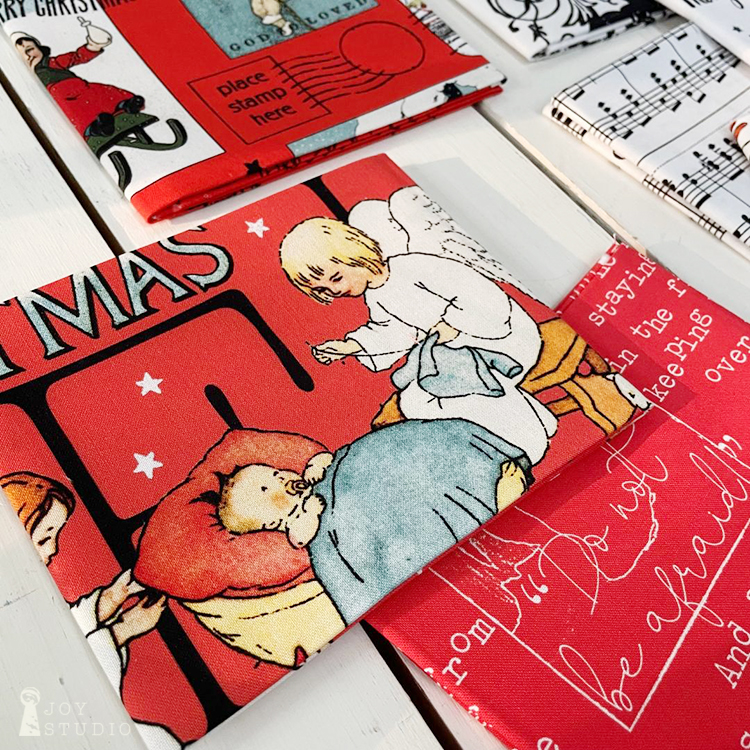
All About Christmas fabric has delivered and is in a shop near you. Find a list of retailers in my last blog post here.
This collection is beautiful! It includes the Christmas story from Luke 2 making it VERY Christmas-y and we especially love those details. In addition, the printing quality is wonderful thank you to our fabric partners at Riley Blake Designs.
•
•
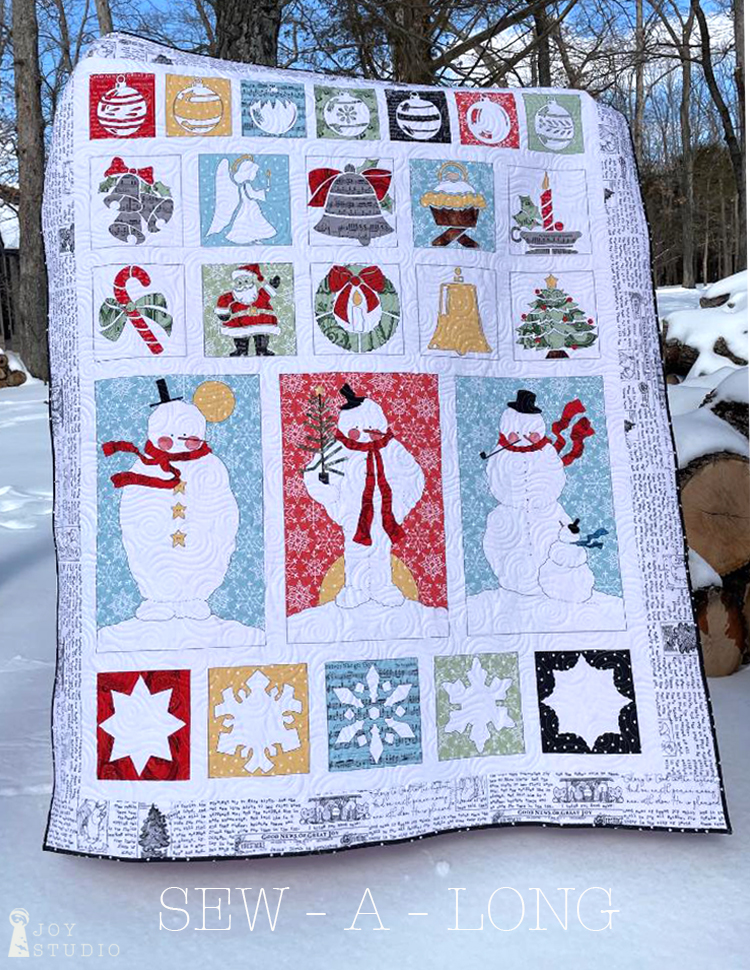
So, here we go with another little Sew-A-Long. This time it will be a mini. The two items that we will be sharing over the three weeks are,
Our three large snowman blocks (row 4)
Reverse raw edge appliqué blocks (rows 1 & 5)
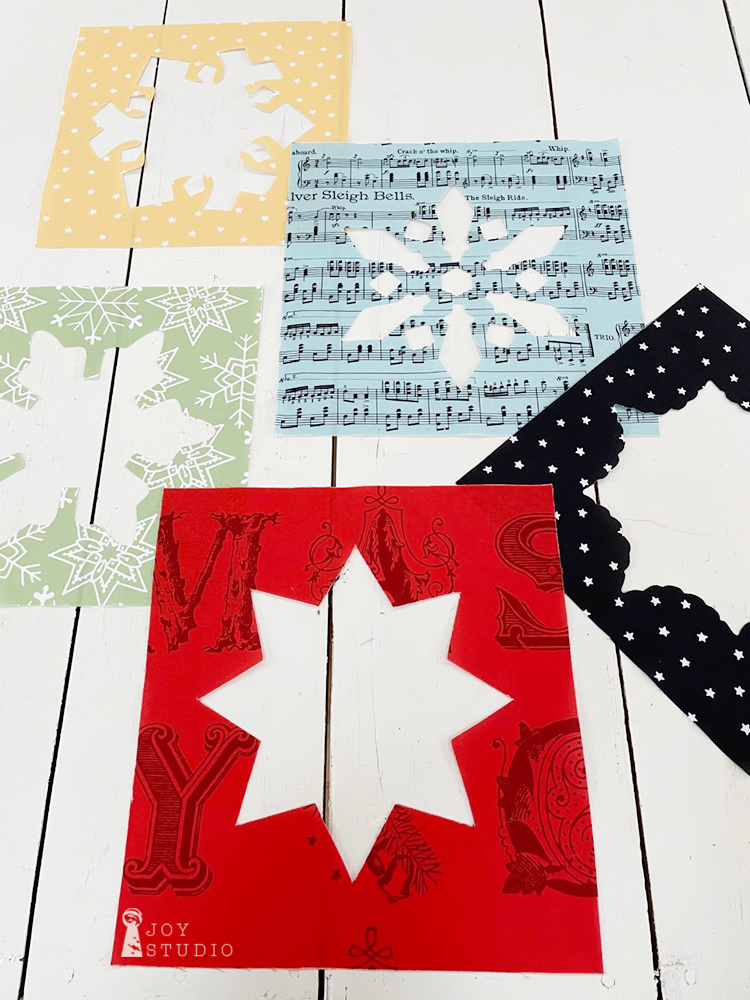
This week we will be looking at number 2, reverse raw edge fusible appliqué for the ornament blocks. The snowflake blocks are done the same way only much less detail so we will be focusing on row one.
Do you have your pattern and fabric ready? If not, visit this link to find a shop.
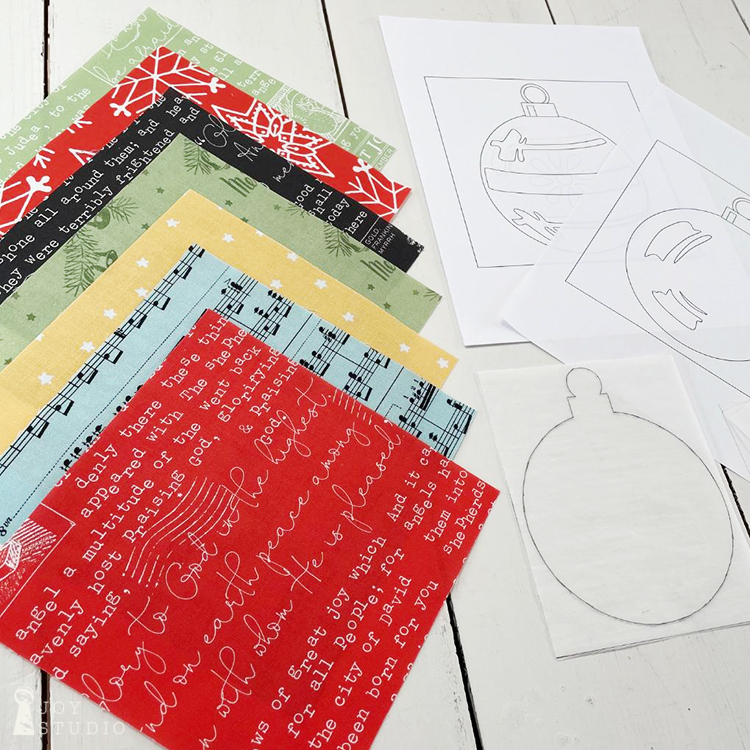
Are you ready to sew?! Let’s go! According to the All About Christmas pattern instructions, it is important ‘To Get Started’ by cutting fabrics for the large snowmen blocks FIRST. This assures that you will have the larger fabric cuts set aside when you need them. Follow the cover art for the fabric choices and make cuts according to the pattern instruction page(s) and directional fabrics. If you are new to the technique of reverse raw edge appliqué I highly suggest reading the pattern in it’s entirety before starting or cutting into your fabrics.
•
•
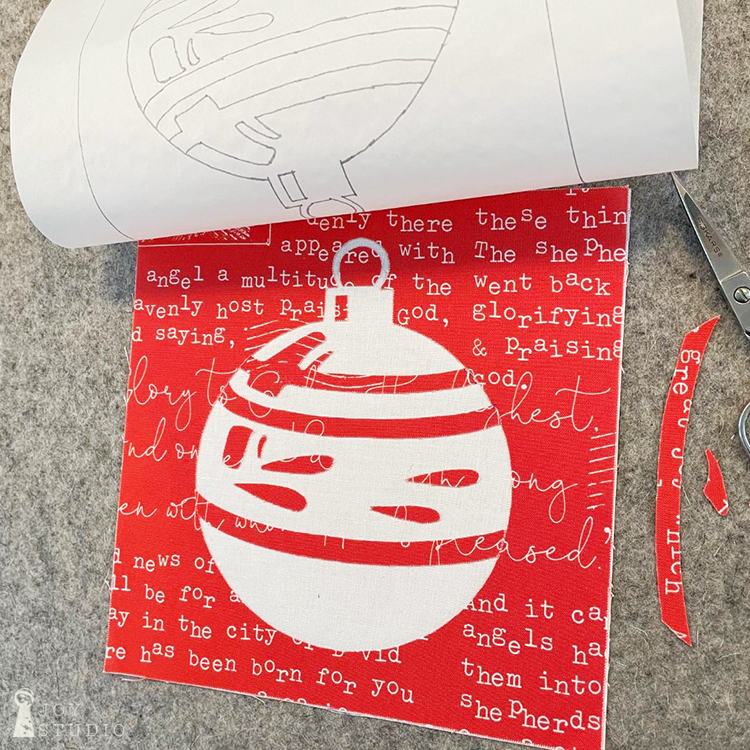
Since some of our designs for this quilt were stencil-like with white as the main center image (see the snowflake and ornament rows), we selected this reverse appliqué technique. Often with appliqué we will use a second interfacing product to mask the background fabric from showing through our white however, we found this to be a better option for the ornament and snowflake blocks on this quilt. The photos below will offer a visual aid so-to-speak to support this explanation.
Once you’ve cut your fabric squares for blocks in Rows 1 and 5, you can begin tracing the designs onto your fusible web product according to manufacturers directions. We like Pellon Featherweight Fusible 805. Be sure to trace all of the pieces that make up the inside ornament designs before fusing. You will be using those to help your fabric remain as a continual image. Fuse to wrong side of fabric considering whether your fabric square will be using a directional print and align accordingly.
•
•
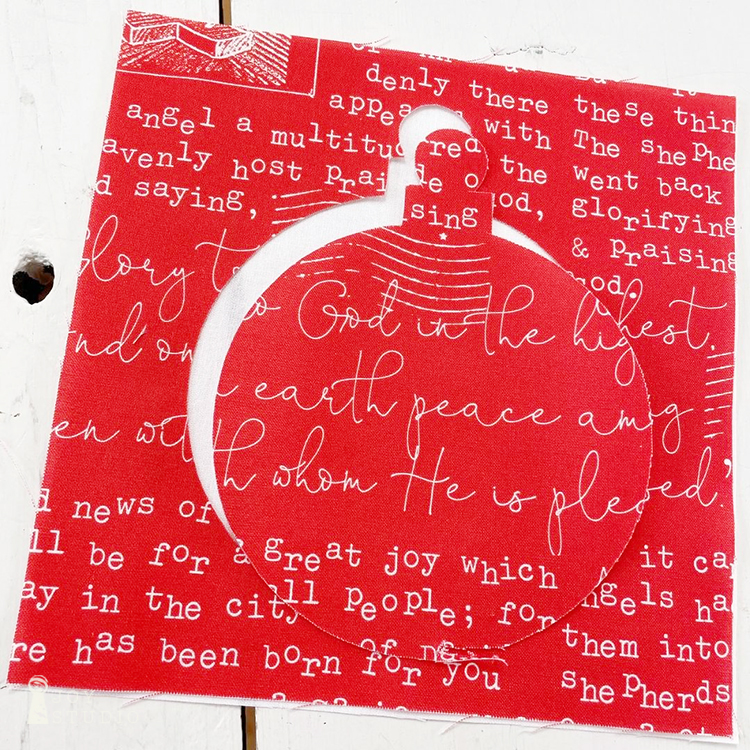
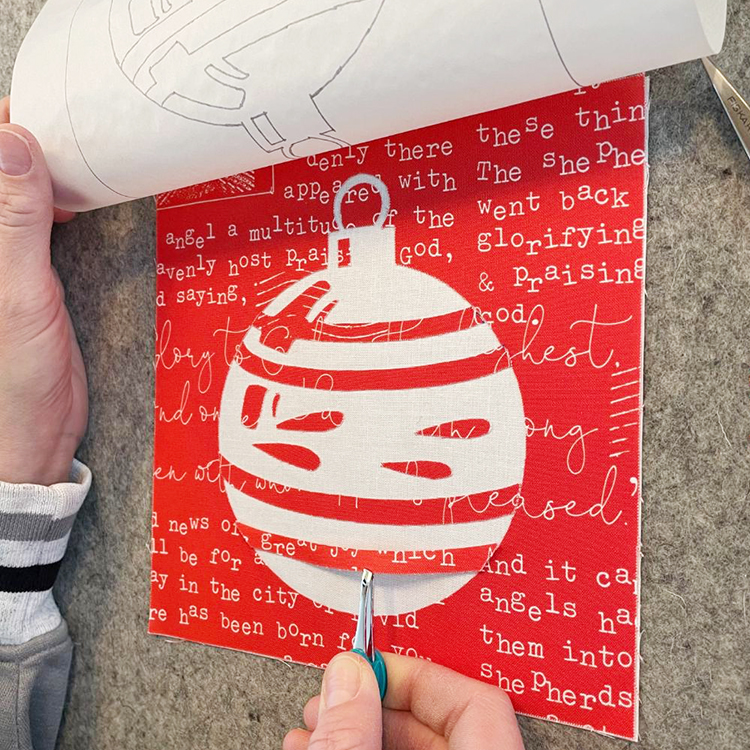
When you go to cut out the ornament rounds, be careful not to cut through the outside square itself or those tiny pieces. You can see at the bottom of our ornament photo below where we began poking the scissors through to cut around the perimeter only. This way, when the traced ornament is removed, your background stays completely intact. Then cut your smaller (traced beforehand) pieces and set them aside somewhat in order, or you can number them if that helps.
•
•
Once all of your ornament pieces are cut out you are ready to fuse. Sandwich the colored fabric silhouette squares on top of your Riley White squares that will show from underneath. You can place the pattern flipped upside down (since already in reverse) beneath your layered fabrics to use as your placement guide. Or, another method that we like to use, is a tracing paper door, as we call it. The photos below plus this link will explain. Simply put, we trace the block template image(s) onto ordinary tracing paper and pin down on one side of your block to help with accurate placement in the event the paper pattern does not show through your fabric. We also found that using tweezers was the easiest way to then nudge the tiny pieces into place. When you get them where you like, fuse!
•
•
Here are our results. Now for the fun part, stitching them down. I will be using thread to match and a blanket style stitch. I find both are somewhat forgiving. You may choose to use any number of decorative stitching to add these details if you prefer over these tiny appliqué pieces. This is where your sewing skills will shine beyond my limited experience so please, send progress photos! And have fun of course 😉
•
•
I hope you had fun sewing along with me! If you have any questions about this technique, leave a comment below! See you next week for the BIG snowmen blocks.