by Great Joy Studio | Sep 30, 2025 | Quilting & Fabric

•
Hello everyone!
I posted this project originally with “Costume Makers Ball” fabric when it was offered from Riley Blake Designs in 2019. Owner, Cindy Cloward thought it was so fun that she is sharing hers as a YouTube tutorial at Riley Blake Designs – YouTube.
•
We borrowed these instructions (below) from our original step by step post which pairs seamlessly with the new “Costume Makers Act II” fabric collection! However, you will want to follow along with Cindy as she creates her version of this festive fall favorite.
•
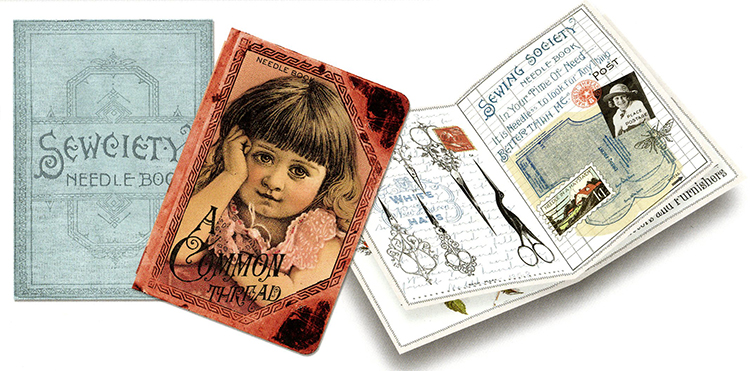
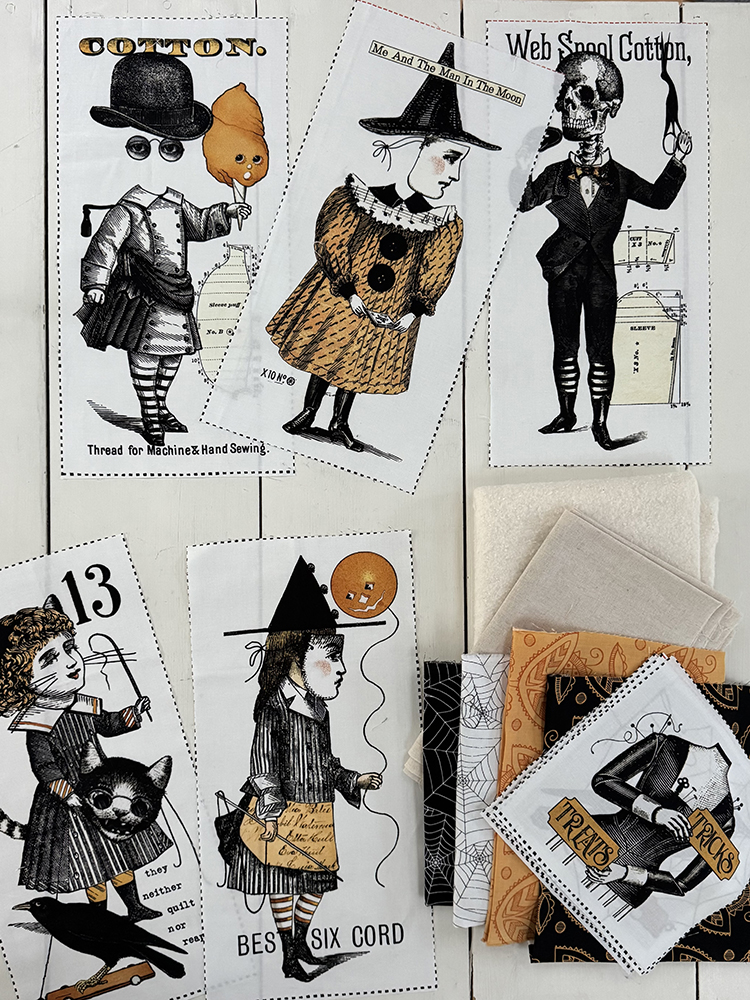
BIG SCARY BOOK!
Featuring,
COSTUME MAKERS Act II
fabric by me, J. Wecker Frisch
from Riley Blake Designs
•
So many of you have asked if this fun fall project was a pattern so, we decided to share the easy process here!
I pretty much made this up as I went along and it was truly so easy. I’m still learning on the sewing front so, if you see anything that can be improved on, I’m interested to hear from you. Of course we love the images on the patch panel and they were the perfect sizes for the pages and pockets to hold whatever spooky items we found around the studio. Choose anything you like in your stash of old photos, tags, charms and trims to personalize your scary book.
•

What you’ll need, beginning with Costume Makers Act II fabric:
• One – Patch Panel for pages and pockets.
• One repeat – Border Stripe for a few fun tags to slip inside and attach.
• Fat quarter – Black Text for cover.
• 1/2 yard – Jac O Lantern Balloons on Black for inside of cover plus one page background.
• Fat eighth – Measure Tape Stripe Blk n Wt for one page.
• 1/2 yard – Riley Blake Linen in Natural for inside pages.
Optional:
• Quilt batting, 1/2 to 3/4 yards based on preference. We used a light weight fusible behind page patches and cover.
• A medium weight Interfacing for a stiff cover cut to 17.5″ x 17.5″
• Measuring tape ribbon, buttons, decorative string, one cargo tag, old key & vintage notions or game cards, etc.
• Fabric only kits available exclusively at greatjoystudio.com/shop/
•
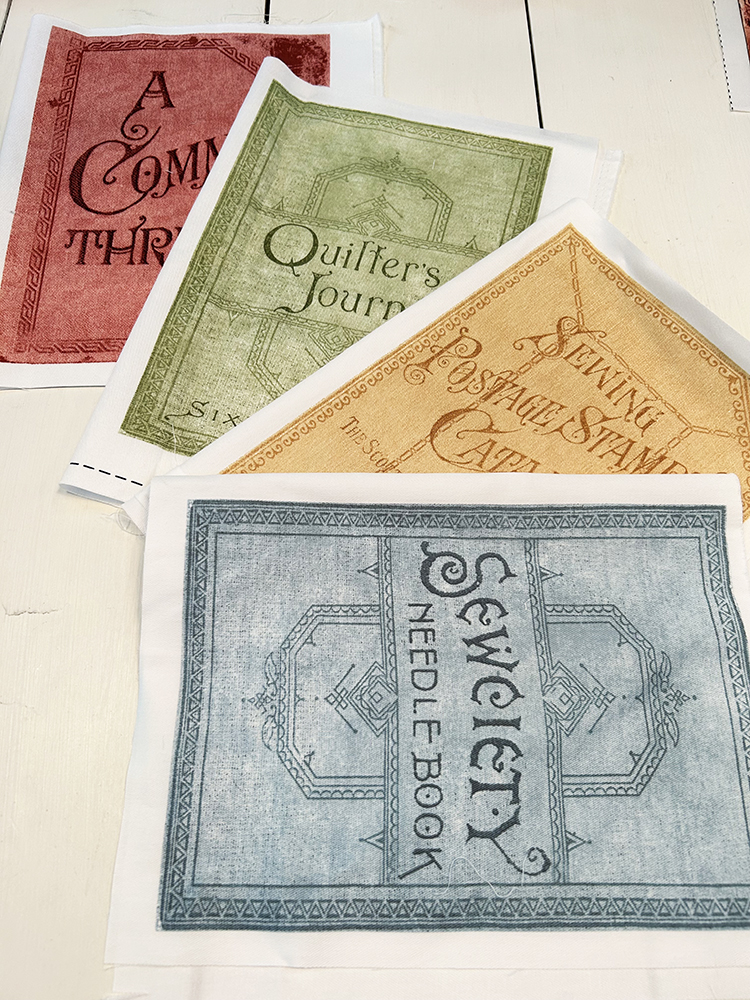
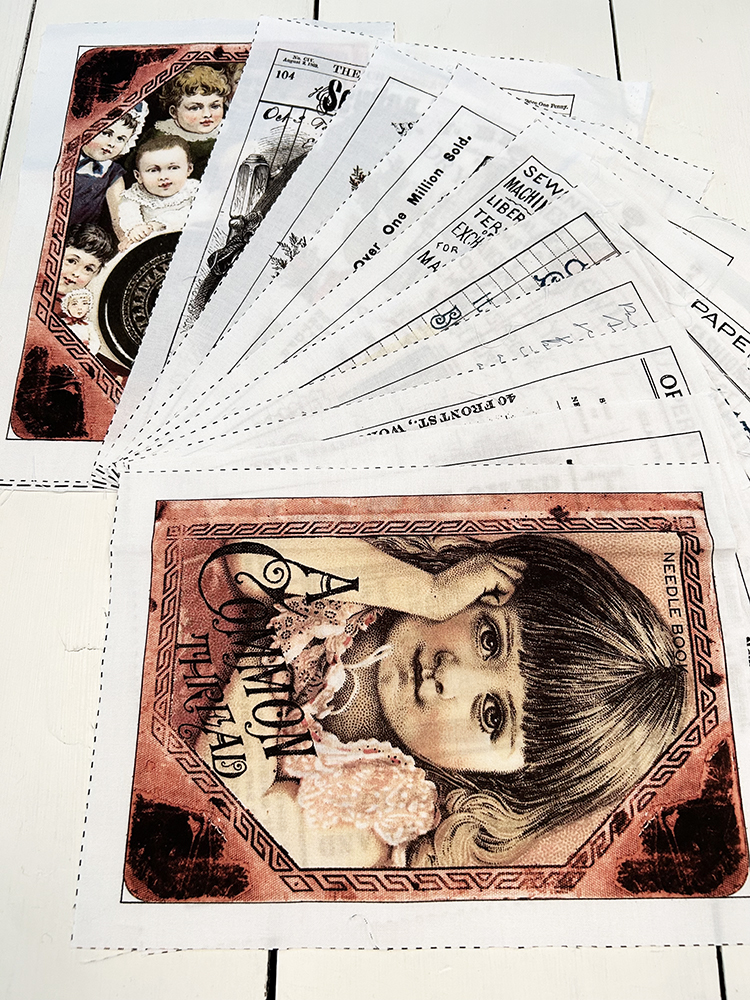
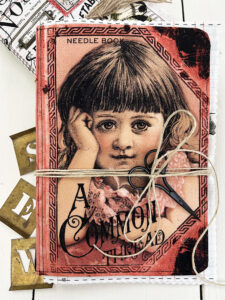
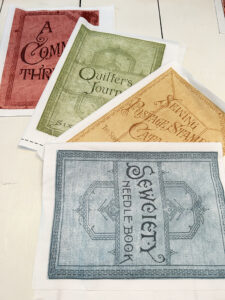
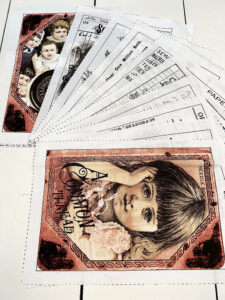
Pictures worth a thousand words?


Pages six & seven with quilted tags made using the CMB border stripe.
•

Sandwich each of the individual cover and (18″ square) page layers as you like. I chose batting between my cover fabrics and under each of the fabric patches. I then used a variety of sketchy stitches around each the page edges to create decorative borders and attach to the linen pieces. Using your skill level and imagination there are no limits to what you will create with these fantastic fabrics! Again, my stitching experience is short and some of these are my first attempts but I was pleased with the results. So remember, have fun, no rules, anything goes and you can’t make a mistake.
•
Here are the the page layouts:

Inside front cover & page 1

Pages 2 & 3

Pages 4 & 5

Pages 6 and 7 are pictured at top of post and are holding the border stripe kid tags.

Page 8 and inside back cover.
Not pictured is the outside cover! We used the CMB black allover text.
•
Complete Scary Book fabric kit available on the Shop page.

•
More Scary Book photos and fun projects on IG @jweckerfrisch and FB Joy Studio
&
Please share your scary book eye candy with us!!

•Be sure to follow us on Instagram @jweckerfrisch & Facebook Tidings Of Great Joy.
by Great Joy Studio | Apr 8, 2025 | Quilting & Fabric
•

•
Spring Fling
&
Spring/Summer Tag Sale!
•


•
Our returning summer hours will be Thursday, Friday and Saturday 10 am -1 pm.
We are currently transforming the quilt workshop studio to include a collection of curated vintage and antique items for sale/donation. The Spring Fling, hosted here in Old Town Eureka, Mo. (April 15-17th) will kick off a summer-long Tag Sale event at the Great Joy Studio shop, 16 Dreyer Ave. All proceeds for this will be donated to Samaritans purse to help their disaster relief efforts.
Mendy from Missouri Stitcher will also be offering long-arm quilting services for any projects you may have.
Watch our IG Great Joy Studio account for updates on the pop-up Tag Sale and IG and FB J Wecker Friscg account for all fabric details.
•


•
See you soon!
by Great Joy Studio | Aug 16, 2024 | Quilting & Fabric
Hi Friends!
I’m going to be honest, summer is not my favorite and this one has been has been a little scary. And hot of course. It has been exciting but nerve wracking, a lot of hard work but fun and all the while fulfilling, as I complete the last steps of my entrepreneurship.
•

•
On a happier note, I’m still going! Here’s the latest:
We are nearly moved into our new office and workshop location at 16 Dreyer Ave., in Eureka, MO. Our new hours for visitors are
Thursday – Saturday from 10:00 am – 1:00 pm.
Follow us on Instagram @jweckerfrisch and Facebook Joy Studio-tiding of Great Joy for upcoming mini classes this fall.
•


•
My three NEW fabric collections from Riley Blake Designs, “Pumpkin Patch”, “Old School” and “Press On” are in quilt shops now! Check them out at your favorite local or on line location.
Our Wonderland Workshop for October 4th is sold out. Next one is scheduled for mid January so stay tuned.
Upcoming events:
This weekend it’s off to Hamilton, Mo. and on August 19 – 20 we will be visiting our friends at Missouri Star Quilt Company! Watch for me on Jenny’s Tuesday Newsday and my interview with Misty Doan on her Homespun channel, in an upcoming episode. I am quite excited about this as you can well imagine!
Studio Class: Fused Applique Fall Place Cards – Details to come on IG and Facebook
Studio Class: Vintage Watercolor Color-Mixing Chart – Details to come on IG and Facebook
Fall Quilt Market in Houston TX is Oct. 26 – 28 where Riley Blake Designs will be introducing my new fall collections, one of which is, “Costume Makers Act II” .
•

•
Well, I think that has us all caught up. I hope to see you soon at one of these events or just drop in to say Hello. We have been enjoying meeting folks, swapping quilt stories and sharing creative journeys. We would love to know yours.
•
by Great Joy Studio | Aug 30, 2023 | Quilting & Fabric
•

Hello there!
•
•
Well, I did not expect my fabric journal journey to take a full year to put up my next blog post! However, if you’re following me on Instagram then you have a pretty good idea of what Great Joy Studio has been up to. Five more fabric collections, a White As Snow Winter-y Projects booklet, lots of quilt design and some time to create a few inspirational pieces for church.
So, let me tell you what else is new like our latest collection from our fabric partners at Riley Blake Designs. “Sew Journal” is the name and is currently delivering (or delivered) to shops this week. Of course it is full of the coolest vintage and antique sewing imagery from my own personal ephemera stash. Some of the pieces are quite rare so I am especially glad that we can present this stunning art and can share on fabric and quilts for years to come.
•

•
We used three of the Sew Journal panels and several scraps from all three of my ‘Journal’ collections, Art Journal, Journal Basics and Sew Journal to continue on our book making exploration. In addition I have gathered all of the tiny and interesting trinkets that one tends to collect through the course of a creative lifetime. You know the ones I mean, countless items that just don’t seam to go anywhere but you hang onto just in case you need for that special project? Well . . . we have it! And we want to invite you to join me at our first Sew Journal weekend retreat. Here are the details:
October 13 – 16
Quilt Town USA – Hamilton MO
MSQC Retreat registration click here!
See you there and keep following us on Instagram for inspiration and retreat updates.
•

•
by Great Joy Studio | Aug 20, 2020 | Quilting & Fabric
Wow, week four already!
•

•
So, this is the part of the Snow-A-Long where it gets tricky for me,
PIECED BLOCKS.
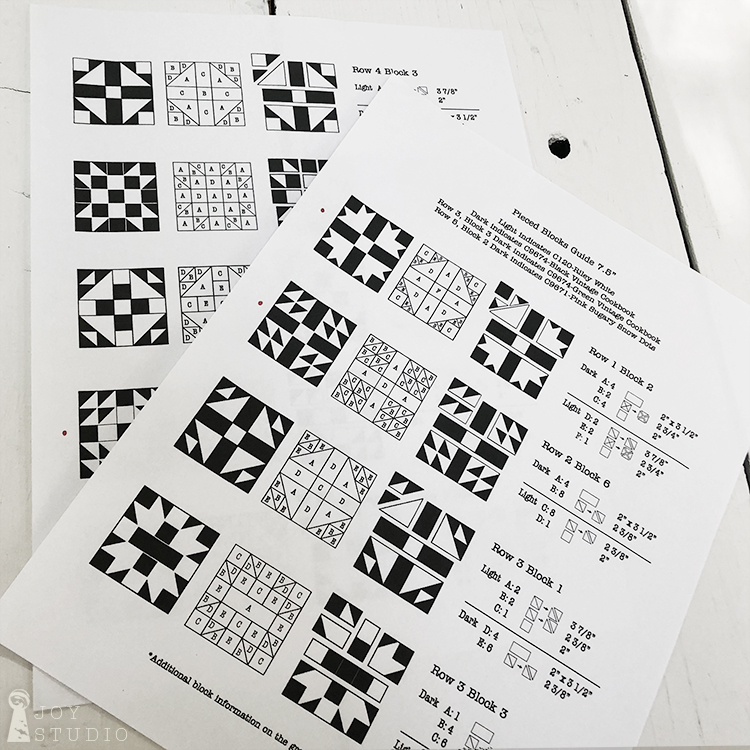
I not an expert when it comes to constructing pieced blocks. On the contrary, I am a novice. I began learning two years ago and have limited experience. I cannot offer tips on how to get these blocks perfect or precise. The best way I can instruct you in this segment is to show how we did it in a picture is worth a thousand words quilt block how to gallery, from a watercolor artist perspective rather than a quilter’s. It worked fairly well for us so no matter what your level of piecing skills is, I am confident that you can do this too.
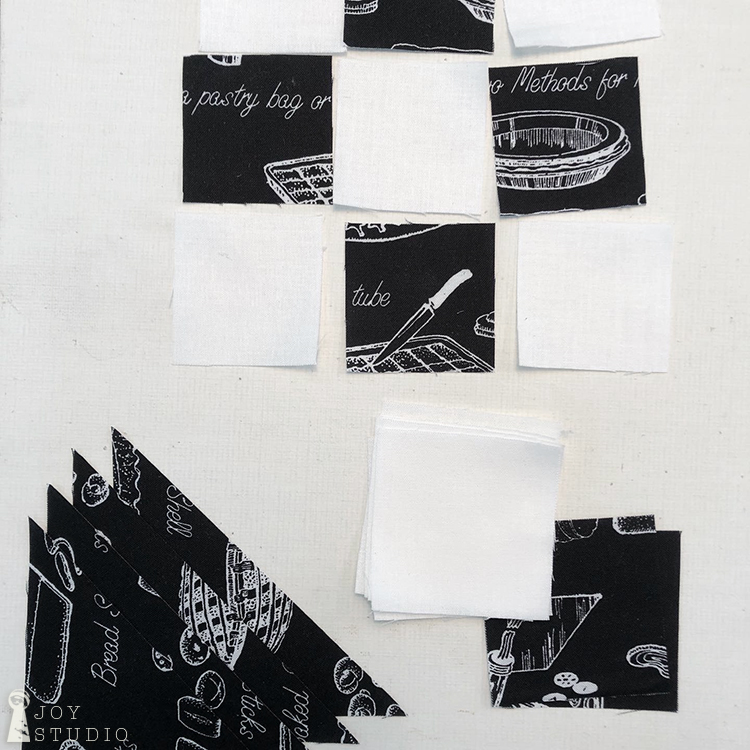
First, using your two Pieced Blocks Guide sheets included in your pattern and the cover art for color, cut all of your fabrics according to the specified sizes in each of the 7.5″ (finish size) blocks. Our approach was block by block although, some of you experienced quilters may want to cut multiple blocks of the black and white fabrics, all at one time. The blocks are all two color classics so we found the majority were fairly simple to construct.
•
•
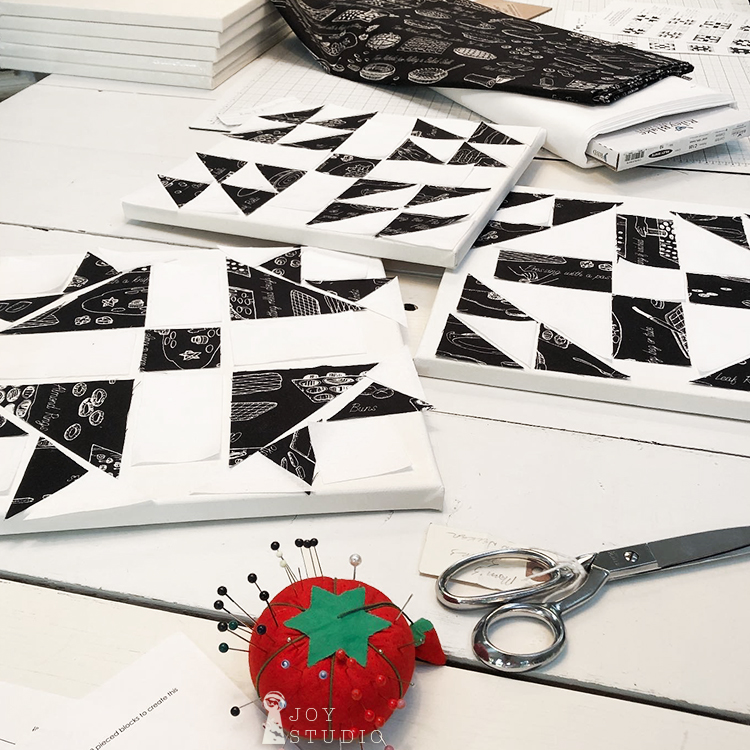
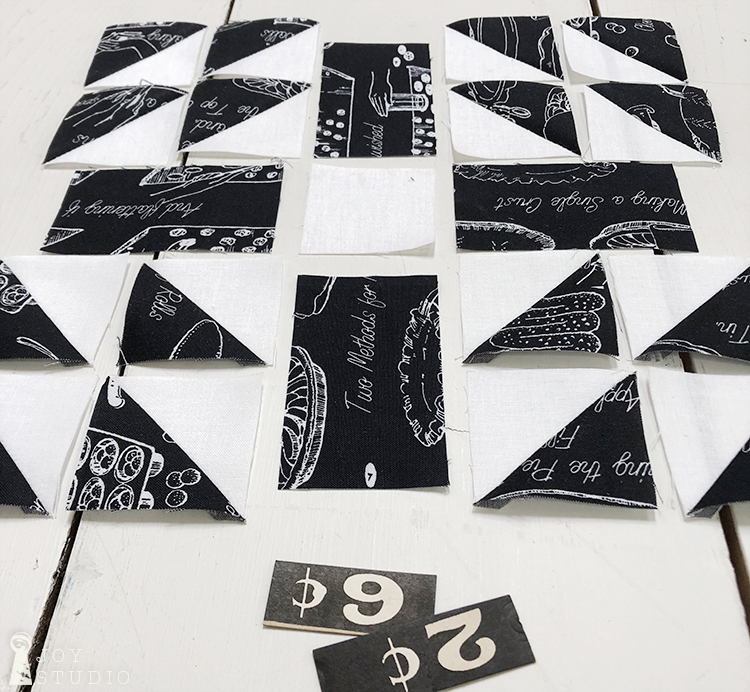
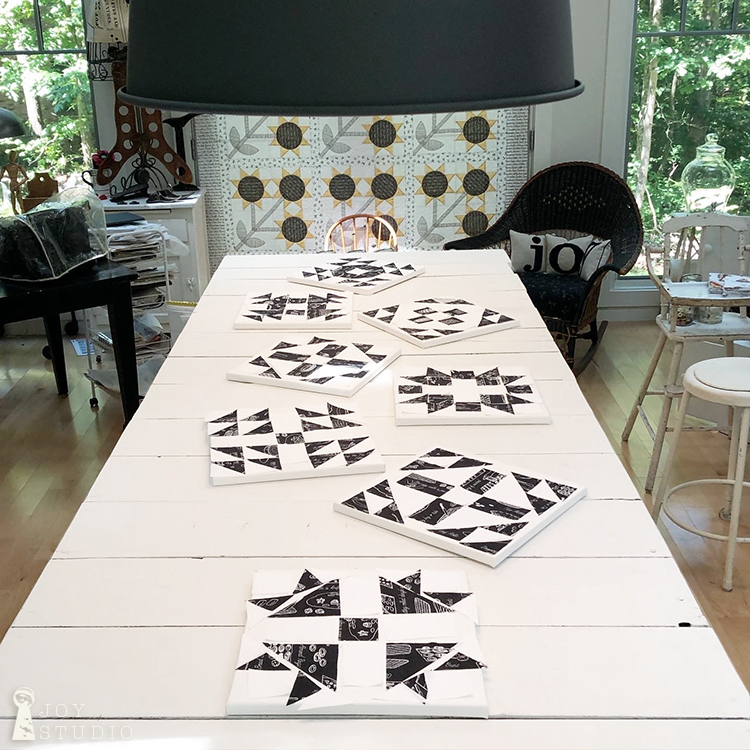
Once all of our fabric was cut we laid out each block’s pieces on pre-stretched artist canvases that we had on hand to use as our mini design boards. I hope to make some proper ones in the near future but these were just the right size and served our purpose.
We also labeled each board by row and block number with post-its. This helped us to keep everything organized until we were ready to sew. It will also help you to spot any mistakes that may have occurred during cutting too, as was the case in our first attempt! Can you spot them?
•
•
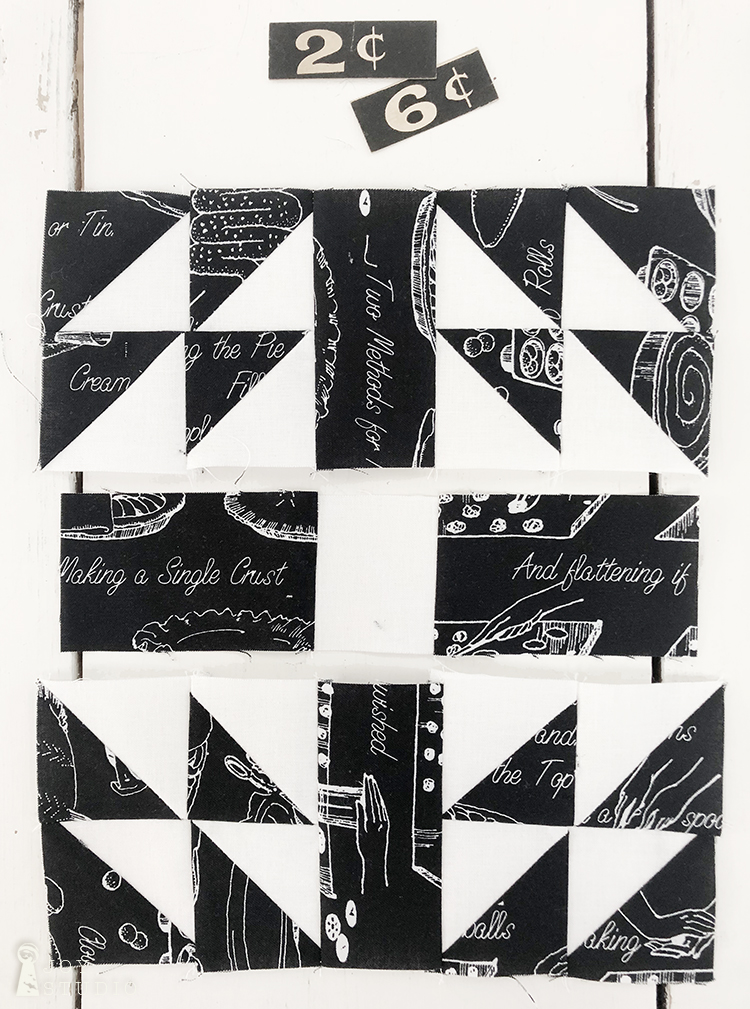
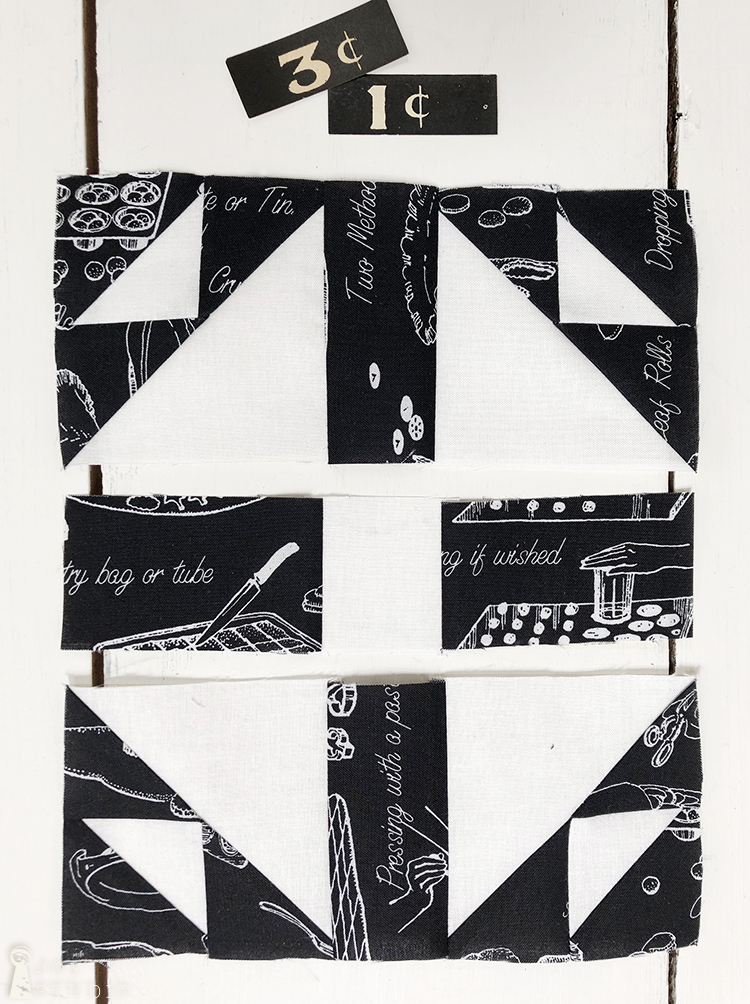
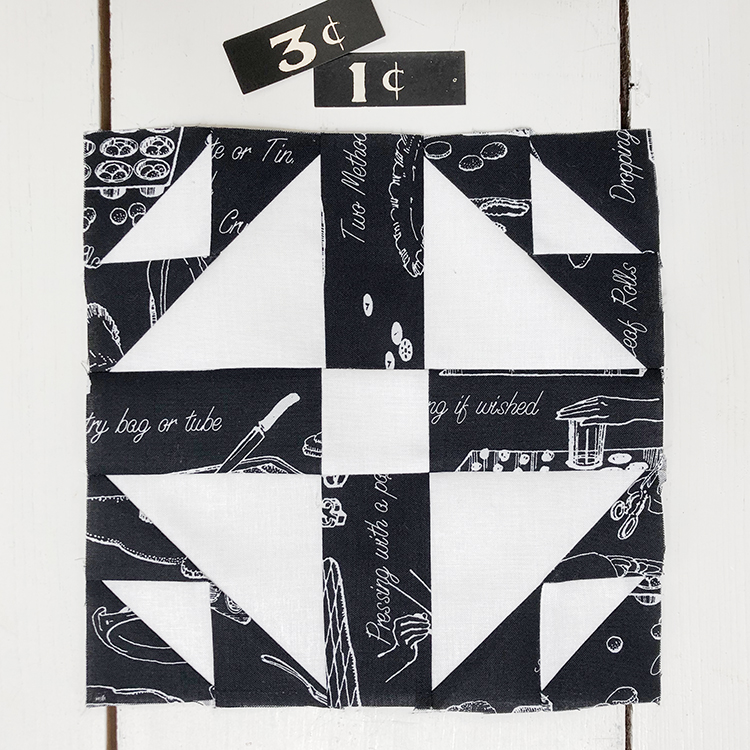
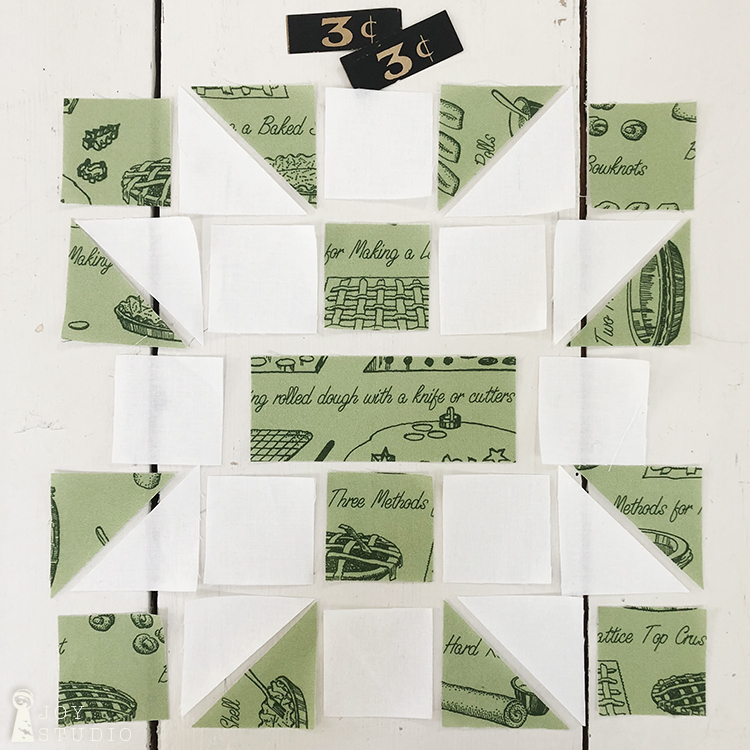
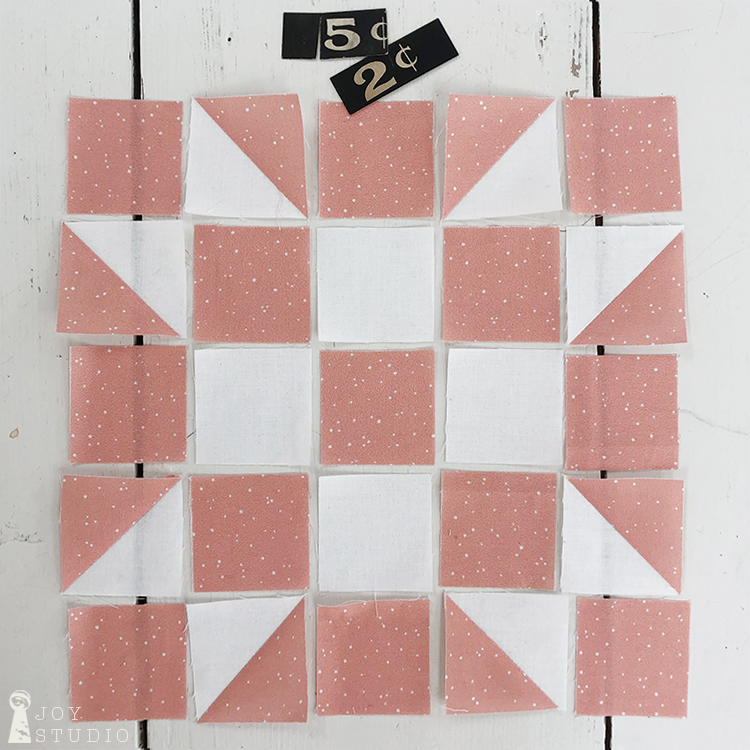
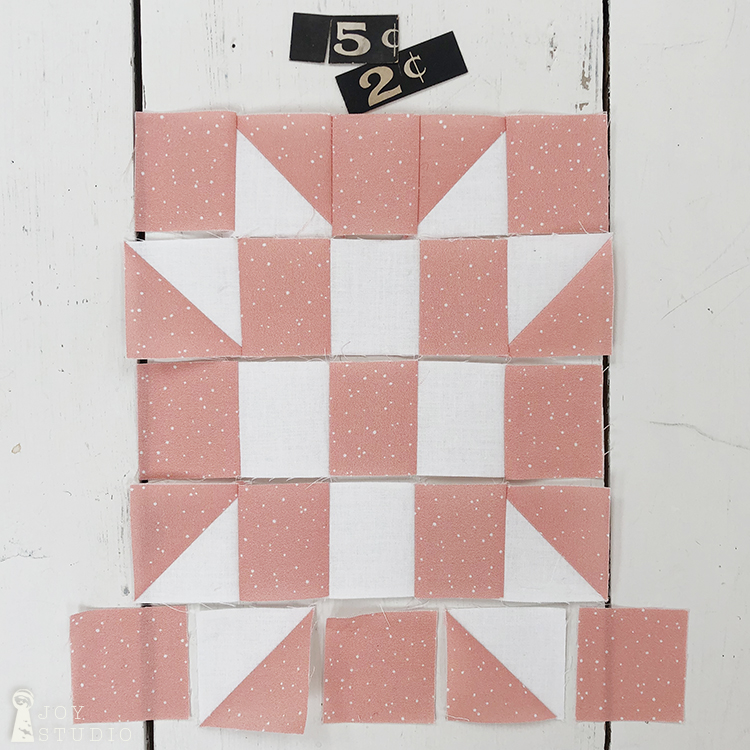
For our post photography we used these cool vintage price labels to show the quilt rows (top #) and blocks (bottom #).
I began with the blocks that were easiest for me to see how they could be assembled in horizontal rows but you can start with any of the blocks that you like. The design boards allow you to arrange the various pieces in advance to see how you think they look best. I tried wherever possible to have my text facing up and the pieces that were sideways, to be facing in the same direction.
•
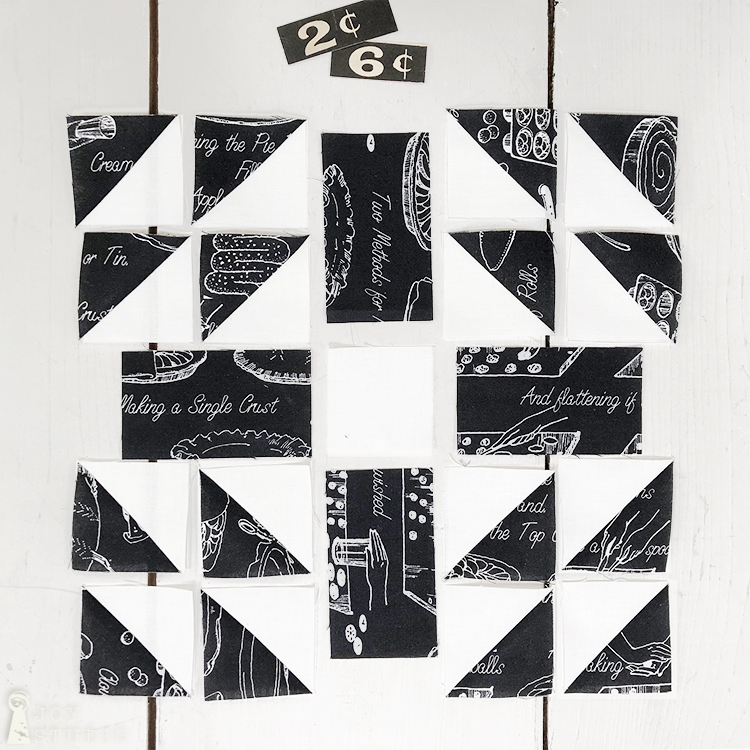
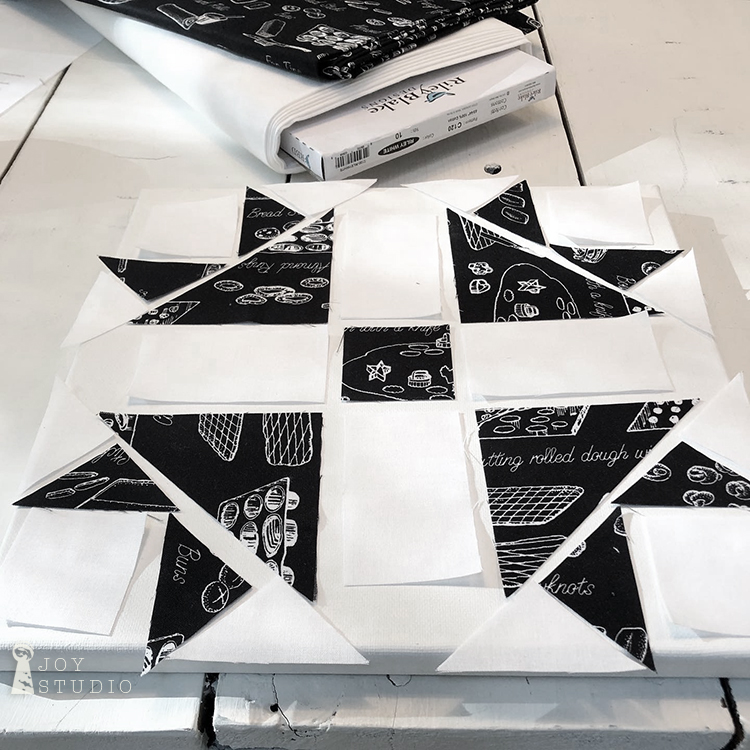
Row 2, Block 6
We attached all of the half square triangles, B and C cuts together with a 1/4″ seam, shown in the first photo. Working from left to right we attached the top left two units together forming a horizontal, half square triangle double. Then we attached the two below those in the same way. After that, all four half square triangles were sewn together forming the top left corner unit of four half square triangles. Follow the same for the remaining three corners.
Attach the two top corner units to each side of your D cuts, and then bottom the same way. Attach the horizontal D cuts with center cut C. You will have three rows. Pin to match seams and working top to bottom attach all three rows together to complete the block.
•

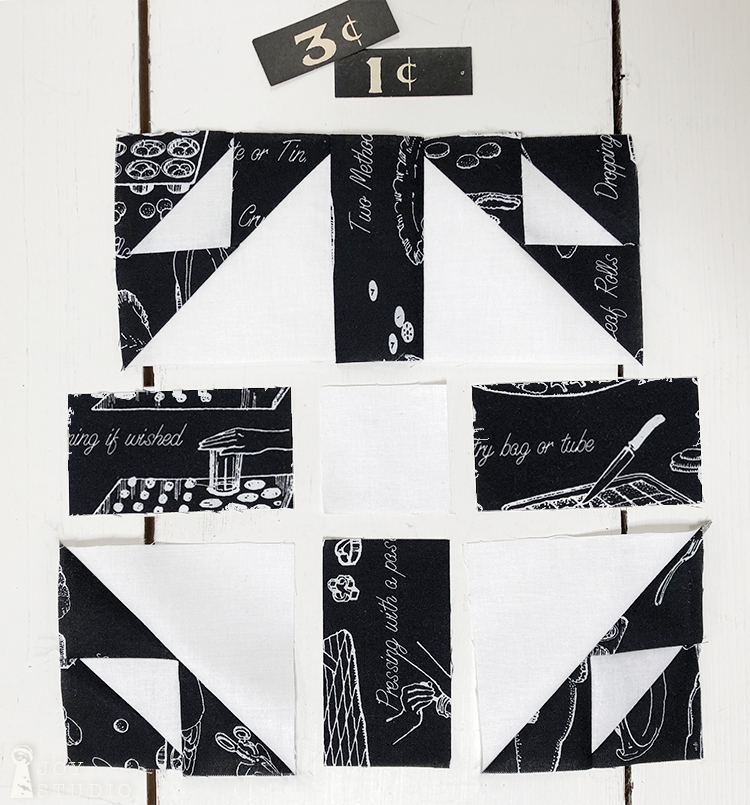
Row 3, Block 1.
I started in the upper left corner making the small half square triangle by attaching E to B with a 1/4″ seam. Then added both of the dark triangles E to two sides of that unit forming a larger, 4 piece triangle. Again and throughout the quilt construction, we tried to maintain 1/4″ seams. To complete the corner unit I then sewed to the large white cut triangle A in the same way you made your first small, half square triangle. I repeated the steps for the remaining three corner units.
Then working from left to right attach top two corner units to D and repeat for the bottom corners. You will then have three horizontal rows. Last we pinned in place to attach all three rows together.
•
More of our picture is worth a thousand words quilt block gallery:

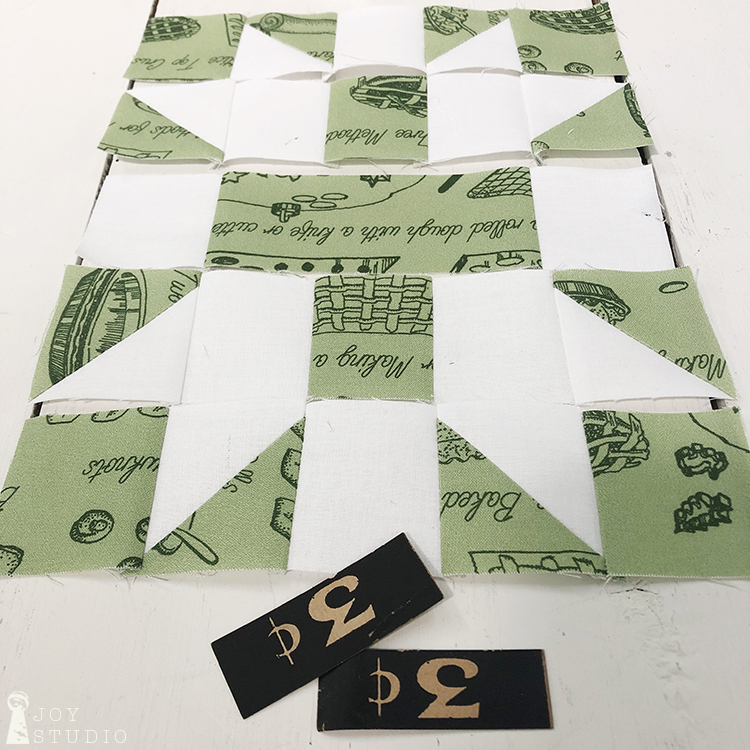


You can see that we followed a similar sequence for each of the remaining blocks. I attached all of the small half square triangles first as I moved from block to block.
•
I do not know the technical terms for block assembly so please excuse me quilters and please, interject your vast knowledge from experience in the comments! We would all love to learn more!
•
•
Once again, this Snow-A-Long features fabric from Riley Blake Designs, Snow Sweet, Riley White and Painters Palette.
I have not included every block in this post but will add the remaining four in a follow up post.
I imagine that most of you following are able to quilt circles around me but I read somewhere once, “finished is better than perfect.” Jenny Doan I believe said that and I found it encouraging.
So, keep going!
And post photos with #snowalong and #snowsweetfabric in your social media so we can find/see your progress.
•